Isabel Marant for H&M

H&M have had some spectacular collaborations over the last 9 years. Starting with the legendary Karl Lagerfeld, we have since been lucky enough to see pieces by Versace, Marni, Roberto Cavalli and now it has just been announced that the latest pairing will be with Isabel Marant.

I can't wait for it to hit the stores. The A/W13-14 was one of my favourite shows of the season and I will be intrigued to see whether it will include more of the brightly coloured and patterned pieces that we saw in SS13 or whether she will be sticking to her monochrome scheme that we saw in the latest show. All I know is that I expect patterns and embellishments as well as unconventional cuts, and it will all be effortlessly chic.


Here are some of my favourite pieces from the last collection and I hope to see items similar to this in the shops come November 14th..

THESE TROUSERS. I love the mixture of textures in this whole look. 


I love the cut of this jumper and the dress that it seems to be layered over. The hem line on the dress is also something we saw a lot of within this collection and I think I have fallen in love with it slightly so I am desperately hoping to get my hands on something like this.
This monochromatic look is something that we've seen a lot of over the past season and I personally love it, especially this look in all white. C'est beau.

YES. EXCITING.

(Images taken from Vogue.co.uk)

Clothes: How I'd Style It

If I had money and wasn't living on a student budget, I'd probably be drowning in clothes. However, I don't have the money and I am still a student (for now) so I have to think properly about what I buy before I buy it, will it go with anything I already own, and how much will I wear it? This is why I tend to buy basic clothes and one of my must haves is a simple pair of black trousers. I have two pairs, a cotton pair and a waxed denim pair and they are the staples of my wardrobe. 
This might seem like a really boring item to do a post about, but they are extremely versatile so I'm going to show you 3 ways that I would style them... if I had the money.
I've used this pair of waxed black trousers from Weekday as an example. They cost £55, slightly more expensive than I would want to pay but still not bad. You can find them HERE.

First up, casual:
The top, also from Weekday (HERE), is a loose fitting baseball style top. It costs a mere £16 and I think I actually might have to invest in it now I've found it. The boots are from Urban Outfitters (£65 - HERE) and although you can't really see in the photo, these are a slightly updated stye of the classic western book that's been so on trend recently and they have cut out sections at the side. The rings are, again, from Weekday costing only £9 for three and can be found HERE
Total cost of outfit not including the trousers: £90

Second, office wear/smart:
Here I've put the trousers with a white oxford shirt, which I actually bought a couple of weeks ago. It's from Urban Outfitters and in the sale at the moment at £25, you can buy it HERE. The shoes are from ASOS and I've been longing after them since I first saw them last week (HERE). The jumper is from Weekday and costs only £27, pretty good for a nice piece of knitwear I think (HERE). Finally this ASOS gold chain brightens the outfit up a bit and can be found HERE.
Total cost of outfit not including the trousers: £99

Finally, dressed up:
For this outfit I put the jeans with a simple mesh insert top from & Other Stories (£19 - HERE), and necklace from the same place at £29 (HERE) and finally some Zara heels that you can buy HERE.
Total cost of outfit not including the trousers: £77.99


Chicken Katsu and Kappa Maki

Another recipe post today but this time something from slightly further afield.. I made chicken katsu and kappa maki (cucumber sushi rolls). It's a really simple dish to make and the only part you really have to practice at is rolling the sushi but there's plenty of videos online that walk you through exactly how to do it.
There's a few things you will need to go out and buy that you probably don't already have in your cupboards but the good news is that most good supermarkets have begun to stock Japanese cooking items so you should be able to buy most of it without having to go to a specialist store. The only thing you may struggle to get is the Tonkatsu sauce, which is a Japanese fruity/almost bbq sauce. I got mine from a Japanese supermarket in London.

This recipe serves 3-4 people and you will need:
For the Katsu:
A chicken breast per person or about 500g of readily sliced chicken breast
2 eggs
Plain flour
Panko (Japanese breadcrumbs)
Tonkatsu sauce
Salt and pepper

For the sushi:
1 cup of sushi rice, uncooked
Cucumber, cut into strips about a cm wide
3 sheets of toasted nori/sushi nori
1/2 tbsp Japanese rice vinegar
A bowl of water
Sushi rolling mat

The first thing you want to do is prepare the rice as per the instructions on the packet. It's a good idea to soak the rice for half an hour before cooking - I think this maybe breaks down the starch and makes it stickier, which is what you want. 
While that's soaking, prepare the chicken. If you've got chicken breasts, slice them into one inch strips.  Lightly salt and pepper the chicken and set to one side for a minute. Now you want to set up 3 bowls: one with flour in; one with the 2 eggs, whisked; and finally one with the panko. There's no exact rule on how much flour or panko. I just judge it by eye, but start with less than you think you might need as you can always add more.
Dip the chicken first in the flour, making sure it's coated all over, then in the egg, and finally into the panko making sure it's got even coverage all the way round.
Once you've done this to all of your chicken, you're ready to start frying. I'm lucky enough to have a chef for a father so our kitchen is quite well equipped with things that some kitchens won't have, like deep fat fryers.. If you have one, heat the oil to 180C. If not, fill a deep frying pan with oil and you will know if it's up to temperature by dropping a bit of the panko in, if it fries and bubbles then the oil is hot enough. 
At this point the rice is probably ready to go on the heat, so bring the water to the boil then turn down to a simmer and cover for as long as the instructions say.
This is quite a tedious process because you don't want to put too much chicken in the oil at once as it will bring down the temperature, so I normally go for 3 pieces at once. The chicken probably takes about 3 to 4 minutes to cook but only take it out when the panko has gone a golden brown. You can then take it out and leave it to rest on some kitchen roll which will aslo soak up some of the oil.
Don't forget to keep an eye on your rice and take it off the heat after the cooking time, transfer it into a bowl and leave it uncovered. Sprinkle it with the rice vinegar and mix. It doesn't matter if you haven't quite finished the chicken it needs to cool down to room temperature anyway.
Once you've fried all of your chicken you'll need to keep it warm while you're making the sushi so I usually put it in the oven at about 75C.

Now for the sushi. Set up your work station with the cucumber, the sushi rolling mat, the bowl of water, the sushi rice and the nori.

Take a knife and wet it slightly, and cut one of the nori sheets in half. Place the sheet onto your rolling mat and wet your fingers, this will stop the rice sticking to your hands. Cover the sheet in rice, leaving about an inch uncovered at the top edge. You want an even covering about half a cm thick. Next place the cucumber a couple of cm from the bottom of the sheet and you are ready to roll. You can also sprinkle some sesame seeds onto the cucumber at this point. This is the tricky part: You want to use the mat to roll the sushi, and I've tried extremely hard to try and explain in words how to do this but it is easier to show you, so you can watch a professional do it HERE.

Repeat this with the remaining 2 and a half nori sheets. Take a knife and wet it slightly, again this will help to cut the rolls. Cut them in half and then into thirds, giving you six even pieces of sushi per roll.

To serve, slice some raw white cabbage and put on the plate with the katsu on top and drizzle with the Tonkatsu sauce. You will want to serve the sushi with a selection of wasabi, soy sauce and pickled ginger.

And there you have it, a delicious Japanese meal, which is really quite simple to make! Try it!


American Inspired: BBQ Pulled Pork

My boyfriend and I have wanted to try out making BBQ pulled pork for a while, so this weekend we finally did. I found a recipe online but adapted it slightly to suit my kitchen and what I had in the cupboards. It really is super simple so don't be put off by the long cooking times.
Excuse the poor quality phone photo - I was far too eager to eat it once it was cooked..
Slow-cooked pork is one of my favourite dishes to cook on a Sunday for a roast dinner. This recipe is very similar; it's cooked for 4-7 hours, really depending on the size of the cut of meat you get. The recipe I found called for shoulder of pork but I always go with loin. Not only does is fall apart and become really tender when slow cooked but there's a nice layer of fat on the top if you like crackling.
This recipe serves 4 - 5 people but if you are big eaters then I would suggest getting a bigger cut of meat because although it may look like enough, it does shrink down in size once cooked.

Recipe

1kg loin of pork
For the seasoning:
2 tsp smoked paprika
4 tsp salt - I like to use Maldon Sea Salt
4 tsp muscovado sugar

Firstly, preheat your oven to the hottest temperature, this will be around 250C. You really want to blast the meat in a hot oven to get some of the moisture out of it. 
To prepare the meat, you should always pat it dry to allow it to crisp up on the outside when you first put it in the oven. Mix together all the ingredients for the seasoning, you will probably have to get your hands in there if, like mine, your sugar has come together to form one giant sugar lump. Muscovado has a tendency to do this. Next use just half of this and just rub it over all sides of the meat. Transfer the meat to a deep baking tray and cover with foil. Put in the hot oven for 35 minutes or until browned.
You then want to turn the oven down to 125C and cook for 4 hours, the temperature inside the meat should reach about 90C and if you have one, measure this with a meat thermometer. If you are unsure, leave it for an extra 30 minutes - it won't do it any harm. You then want to take it out of the oven and either pour the meat juices that are in the bottom of the baking tray into a bowl and put to one side, or move the meat over to another tray. Turn the temperature of the oven all the way back up to the highest setting and blast it for another 30 minutes.
After this, take the meat out of the oven and cover in foil. You should leave it to rest for at least half an hour. Don't skip this step! The smells coming from the oven may have been teasing you all day but this really does make a huge difference! You then want to shred the meat. I tore it apart by slicing with a chefs knife and then chopped it a bit more - it kind of falls apart as you cut it anyway. Any bigger bits I just pulled apart with my fingers. Put the meat in a serving dish and sprinkle on the remaining of the seasoning that you made earlier and also pour over the juices that you'd previously drained off. Then give it a good mix and put it in the oven again for 15 minutes just to heat back up. I would suggest making a BBQ sauce to have with this but I was too lazy and bought a jar from the supermarket and just heated it slightly and it was still delicious.
You'll then have beautifully tender and BBQ flavoured pork. I served mine with the classic BBQ side, macaroni and cheese, and some veg. Enjoy!

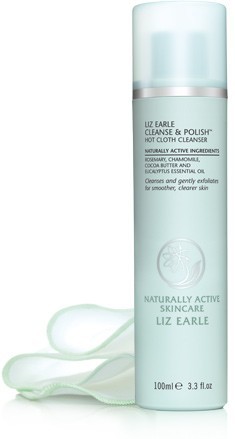
Skincare: Liz Earle Cleanse and Polish


I never used to pay too much attention to looking after my skin, but towards the end of my teenage years and coming into my early twenties I started to realise the importance of cleansing and moisturising daily. The reason I never cared about it was because I struggled to find products that I really liked and that worked for me; having sensitive skin causes all kinds of problems when it comes to skincare.
But then my mother introduced me to skincare brand, Liz Earle. Liz Earle is a company that pride themselves on using naturally active, high quality and safe ingredients. I started using their Cleanse and Polish - Hot Cloth Cleanser about a year ago now and I don't think I will ever look back. The starter kits contain a 100ml pump of the cleanser and a muslin cloth and costs £14.75 - a pretty good price for the quality of the product.
To use, you firstly apply the product to a dry face and neck and massage it in. I tend to do this for about 2 - 3 minutes but I don't think it really matters how long you do it for. Because all ingredients are safe you can even rub it into your eyelashes to remove mascara - something that if done with other products would probably results in tears. The next step is to soak the muslin cloth in hand-hot water, wring out the excess water and start to lightly sweep away the cleanser. Finally, a splash of cold water onto your skin to help reduce pore-size.
After using, my skin not only feels softer but it looks fresher. It is suggested that you use this twice a day, but I only use it once and I still notice a difference. I have been recommending this to friends ever since I started using it and if you have struggled before to find naturally active products that actually do a good job, try this!

Wearable Make-Up Trends

"Barely there" make up always seems to make an appearance somewhere during fashion week, but this season the dewy finish seems to have taken a backseat and has been replaced by perfectly matte and contoured skin. I love this as although I've always thought dewy skin looks amazing on some skin tones, and especially those with very clear skin, it just doesn't suit me and I'm sure others will feel the same. Here's my breakdown of my favourite make-up trends this season that I think anyone could wear.


Balmain
image
This look by Balmain shows off the 'non make-up' trend perfectly and it is possibly my favourite of this particular style. It's beautifully understated, effortless and also entirely wearable. Another great thing about it is that it's versatile: a quick swipe of lipstick could transform this into a simple evening look (Diane Von Furstenberg and Fendi did just that).


Dolce and Gabbana
image
The 60's feline flick has made yet another appearance on the catwalk. This look by Dolce and Gabbana is extremely classic, it was paired with backcombed beehives which were also sometimes accessorised with extravagant crowns. Once you have mastered the flick (I still haven't quite) this is an easy look to create. Matte lipstick, another favourite of mine, was added and the skin left slightly dewy, but not as much as we've seen in previous seasons.


Diane Von Furstenberg
image
I mentioned this Diane Von Furstenberg look above, and it's a trend I have been trying out myself recently although I do apply a very small amount of mascara. The skin is highlighted slightly around the eyes and subtly contoured around the cheekbones. This whole look is in the barbie pink lipstick: it's garish and bright and it only works because of the bareness of the rest of the face. Too much eye make-up and blusher and it really might start to look a bit barbie-esque, so be aware of that if you want to try this out yourself.


Anna Sui
image
Now this look by Anna Sui isn't so wearable but it was one of my favourites, modelled here by the lovely Cara Delevingne. Thick black eyeliner flicks and marks underneath the eye are reminiscent of the classic Twiggy style. The hair was left simply styled or tied back in looped ponytails which worked well with the bold make-up.

(Images taken from Vogue.co.uk)

Hair Care: Aussie Miracle Hair Insurance


image

I'm a natural brunette and to get it to the blonde that it is now, I have had to bleach the HELL out of it. This results in my hair sometimes feeling quite brittle and dry, not to mention the split ends I have to contend with.
Being a long time fan of Aussie products I decided to give this leave-in conditioner a go, and I can't tell you how glad I am that I did. It leaves my hair feeling not only soft, but back to the good condition it was in before I attacked it with bleach. Although haircare can be expensive sometimes, this comes in at only around £5, so it's affordable even if you're on a student budget like myself.

image

I would strongly recommend this product to any of my friends who struggle with dry, split ends and just need that little bit of extra moisture that normal conditioner doesn't always give you.


Template by BloggerCandy.com